Intercepting Traffic from Docker Containers with Mitmproxy
Overview
Mitmproxy is an open-source proxy written in Python that allows interception, inspection, modification, and replay of network traffic between a client and a server. Typically users start the proxy from the command line, configure their application (such as a web browser or a mobile app) to use the proxy port, and then all traffic flows through the proxy where it can be intercepted.
While such a setup is a powerful tool to have, there are cases where you might not have the option or the inclination to configure your application to use mitmproxy's port, for example:
- Closed-source or proprietary software that do not allow proxy configuration
- Applications which do not respect the HTTP_PROXY or HTTPS_PROXY environment variables (most Go applications are like this)
- Poorly written and legacy code where it would be difficult to ensure that all external HTTP calls make use of a proxy port
This can be solved by using Mitmproxy in transparent mode along with our application running inside a Docker container. Transparent mode means that Mitmproxy is able to intercept requests as the network layer and not just from the application. So we do not need to change the configuration of our application.
We could follow the Mitmproxy docs to run it in the same container that our application runs, however there are still some issues with this approach:
- The application container might already have Iptables configured which would interfere with Mitmproxy's setup
- We would need to install dependencies such as Python which might conflict with existing dependencies already installed
- The installation process would need to be manually repeated for each container we want to intercept, because every container is different - some run ubuntu, others run alpine, some has bash, others have sh etc.
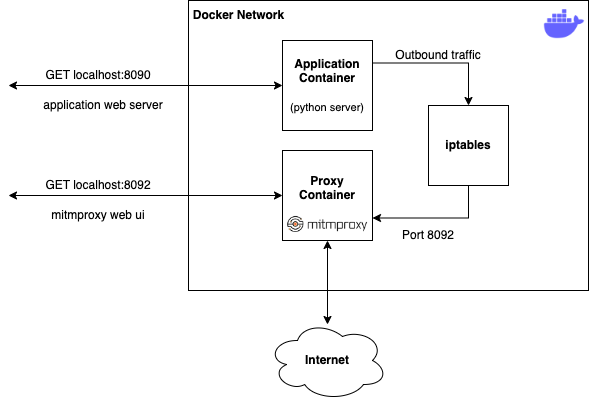
So to address both of these issues, we run mitmproxy in a separate container - called the proxy container, and we configure the application container to use the proxy container's network. This means that the application container does not need to be modified, simply restarted with the --network option changed. And the proxy container can be re-used to intercept other applications, without any manual setup. This configuration is illustrated below:
The Application Container
Let's start by creating an application, who's outbound traffic we want to intercept. We'll create a simple web server in python which returns some content when you make a GET request to it. The server handler will also make its own HTTP request to http://pntest.io every time it receives a request.
In app_container/server.py:
import os
from http.server import BaseHTTPRequestHandler, HTTPServer

import requests

host_name = os.environ['HOST_NAME']
port = os.environ['PORT']

RESPONSE_HTML = "This is an example web server. Request path: %s"

class ServerHandlers(BaseHTTPRequestHandler):
    def do_GET(self):
        response = requests.get("http://pntest.io" + self.path)
        print("Response from pntest.io: ", response.status_code)

        self.send_response(200)
        self.send_header("Content-type", "text/html")
        self.end_headers()
        self.wfile.write(bytes(RESPONSE_HTML % self.path, "utf-8"))

if __name__ == "__main__":
    server = HTTPServer((host_name, int(port)), ServerHandlers)
    print("Server starting at http://%s:%s" % (host_name, port))
    server.serve_forever()
Now lets run this server in a container by adding a Dockerfile.
In app_container/Dockerfile:
FROM python:3.11-slim

ENV HOST_NAME=0.0.0.0
ENV PORT=8090

WORKDIR /app
ADD ./ /app

RUN apt-get update
RUN apt-get upgrade -qy
RUN apt-get install curl -qy

RUN pip install --upgrade pip
RUN pip install requests

EXPOSE 8090

ENTRYPOINT ["python", "/app/server.py"]
Test the server works by building and running the container:
$ docker build -t my_server .
$ docker run -p 8090:8090 -i -t my_server:latest
Then browse to http://localhost:8090 and you should see content returned from the server.
The Proxy Container
For the proxy, create a script which will set the iptables rules to route all traffic through mitmproxy, and also start mitmproxy itself.
In proxy_container/run.sh:
iptables -t nat -A OUTPUT -m owner ! --uid-owner mitmproxyuser -p tcp --dport 1:65535 -j REDIRECT --to-port $PROXY_PORT

su mitmproxyuser -c "mitmweb -p $PROXY_PORT --web-port $WEB_UI_PORT --web-host 0.0.0.0 --mode transparent"
The iptables rule essentially says to route all outbound TCP traffic to `$PROXY_PORT`, unless the traffic is coming from the mitmproxyuser. This is so that we don't create an infinite loop where mitmproxy sends the requests back to itself.
Now to run the proxy in a container, we add the Dockerfile and a script which sets the environment variables, install dependencies and create the mitmproxyuser.
In proxy_container/Dockerfile:
FROM python:3.11-slim

ENV PROXY_PORT=8091
ENV WEB_UI_PORT=8092

WORKDIR /app
ADD ./ /app

RUN apt-get update
RUN apt-get upgrade -qy
RUN apt-get install iptables curl -qy

RUN pip install --upgrade pip
RUN pip install mitmproxy

RUN useradd --create-home mitmproxyuser
ENTRYPOINT /bin/bash run.sh
Test the proxy works by building and running its container:
$ docker build -t proxy .
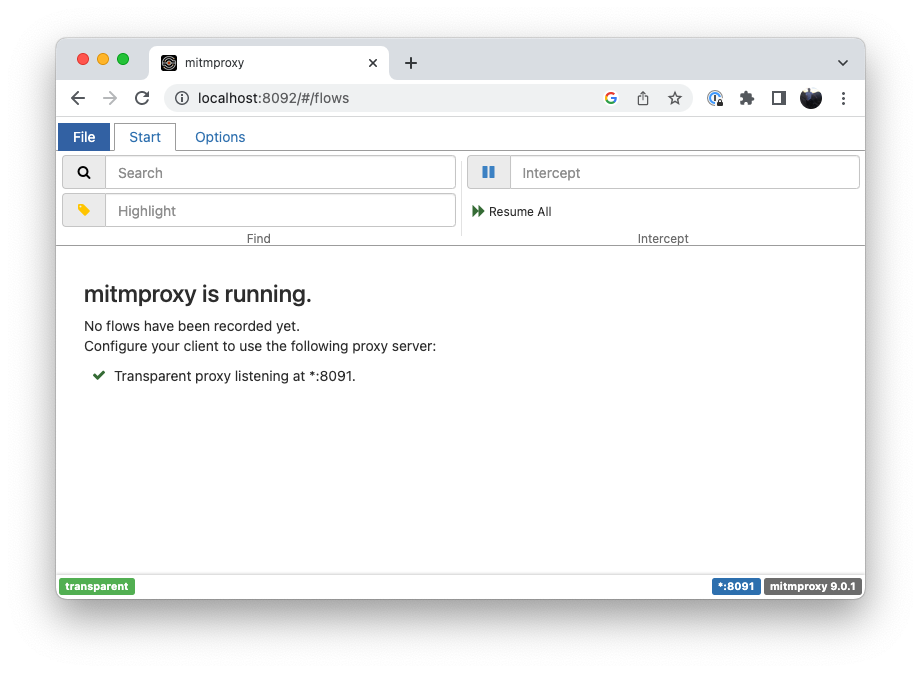
$ docker run --privileged -p 8092:8092 -i -t proxy:latestNote that `--privileged` is required in order to set the iptables rule, otherwise it will fail with an "operation not permitted" error. We also forward port 8092 to the container because that is where the mitmproxy web UI is running. Open http://localhost:8092 in a browser to get the Mitmproxy web UI:
To verify that request intercept is working, get the id of the proxy container you just started, open a bash console on it, and make a curl request to a URL:
$ docker container ls
CONTAINER ID IMAGE COMMAND CREATED STATUS PORTS NAMES
d7219ea073ce proxy:latest "/bin/sh -c '/bin/ba…" About an hour ago Up About an hour 0.0.0.0:8090->8090/tcp,
0.0.0.0:8092->8092/tcp inspiring_mendeleev
$ docker exec -it d7219ea073ce bash
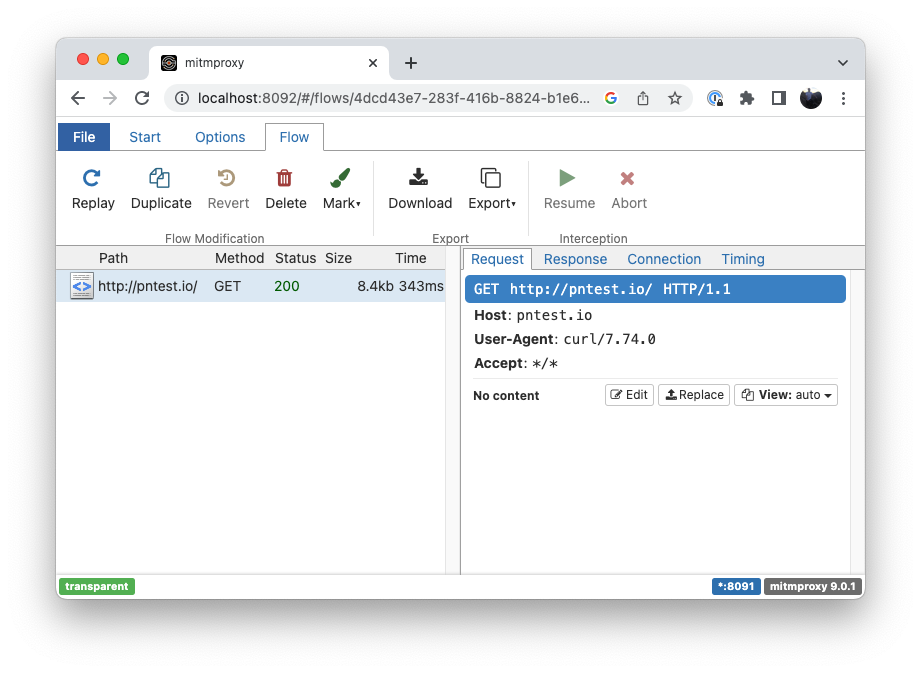
root@d7219ea073ce:/app# curl https://www.pntest.ioNow check the web UI again and you should see the request you just made with curl come up:
Intercepting the Application with the Proxy
In the last two steps, we created an application whose traffic we want to intercept, and we created a proxy container which routes all of its traffic to mitmproxy. To intercept the traffic from the application container, start the proxy container with ports forwarded for both the Mitmproxy web UI and for the application container's server:
$ docker run --privileged -p 8090:8090 -p 8092:8092 -i -t proxy:latestThen start the application container without any ports forwarded and with the --network option set to the proxy container's ID:
$ docker run --network container:d7219ea073ce -i -t my_server:latestNow try browsing to http://localhost:8090 and you should see the request that the server makes to https://www.pntest.io appear in the MitmProxy web UI.
Why does this work? By setting --network container:d7219ea073ce on the application container, we tell it to use the network of the proxy container, so both the app and proxy containers are effectively sharing the same traffic. This is why we also need to forward the port 8090 to the proxy container, in order to allow the server to still be accessed from the outside.
This approach is powerful because we can use the proxy container to intercept traffic from any other containers regardless of what applications or configuration is running on them.